ZX-L
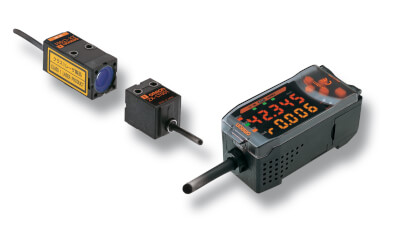
Микропроцессорный лазерный измерительный датчик, отличающийся высокой точностью и быстродействием
Микропроцессорные датчики ZX-L работают по принципу "подключи и измеряй", обеспечивая эффективное решение задач, требующих высокого разрешения и быстродействия. Широкий диапазон сменных измерительных головок предоставляет большую гибкость при реализации систем с самыми высокими требованиями.
- Легкие, миниатюрные головки датчиков легко подсоединяются и сменяются
- Время реакции всего 150 мкс
- Простая смена головки датчика
- Модульная конструкция датчиков ZX обеспечивает большую гибкость применения.
- Подключение до пяти датчиков для многоканального измерения
Ordering information
Sensors
Sensor head (reflection type)
| Resolution 1 | |||||
|---|---|---|---|---|---|
Sensor head (through-beam)
| Resolution 2 | ||||||
|---|---|---|---|---|---|---|
Amplifier units
Note: Compatible with sensor head connection.
Accessories (order separately)
Calculating unit
Side-view attachments
SmartMonitor sensor setup tool for Personal Computer connection
| ZX-SW11EV31 |
Cables with connectors on both ends (for extension)1
| 9 m2 |
*1 Robot cable models are also available. The model numbers are ZX-XC_R.
*2 For use only with reflective sensors.
Specifications
Sensor head (reflection type)
| Visible-light semiconductor laser (wavelength 650 nm, 1 mW or less, Class 2) | ||||||||
| Beam diameter5 | ||||||||
| Resolution6 | ||||||||
| Linearity7 | ||||||||
| Temperature characteristic8 | ±0.03% FS/°C (except for ZX-LD300 and ZX-LD300L, which are ±0.1% FS/°C.) | |||||||
| Operating: 0 to 50°C, storage: -15 to 60°C (with no icing or condensation) | ||||||||
| 10 to 150 Hz, 0.7-mm double amplitude 80 min each in X, Y, and Z directions | ||||||||
| 300 m/s2 3 times each in six directions (up/down, left/right, forward/backward) | ||||||||
| Case: PBT (polybutylene terephthalate), | Case: PBT (polybutylene terephthalate), | |||||||
Note: Highly reflective objects can result in incorrect detection by causing out-of-range measurements.
Sensor head (through-beam)
| Visible-light semiconductor laser (wavelength 650 nm, 1 mW or less, Class 1) | |||||||
| Resolution9 | 4 µm10 | 4 µm11 | 12 µm12 | ||||
| Operating: 0 to 50°C, storage: -25 to 70°C (with no icing or condensation) | |||||||
Amplifier units
| Possible average count settings13 | 1, 2, 4, 8, 16, 32, 64, 128, 256, 512, 1,024, 2,048, or 4,096 | |
| When connected to a reflective sensor head: 0.01% FS/°C, when connected to a through-beam sensor head: 0.1% FS/°C | ||
| Linear output14 | 4 to 20 mA/FS, max. load resistance: 300 Ω, ± 4 V ( ± 5 V, 1 to 5 V 15), output impedance: 100 Ω | |
| Judgement outputs | NPN open-collector outputs, 30 VDC, 50 mA max. | PNP open-collector outputs, 30 VDC, 50 mA max. |
| Laser OFF input, zero reset input, timing input, reset input | ON: Short-circuited with 0-V terminal or 1.5 V or less | ON: Supply voltage short-circuited or supply voltage within 1.5 V |
| Measurement value display, present value/set value/light level/resolution display, scaling, display reverse, display OFF mode, ECO mode, number of display digit changes, sample hold, peak hold, bottom hold, peak-to-peak hold, self-peak hold, self-bottom hold, average hold, delay hold, intensity mode, zero reset, initial reset, ON-delay timer, OFF-delay timer, one-shot timer, deviation, previous value comparison, sensitivity adjustment, keep/clamp switch, direct threshold value setting, position teaching, 2-point teaching, automatic teaching, hysteresis width setting, timing inputs, reset input, monitor focus, linear output compensation, (A-B) calculations16, (A+B) calculations4, mutual interference4, laser deterioration detection, zero reset memory, zero reset display, key lock | ||
| Operation indicators: High (orange), pass (green), low (yellow), 7-segment main display (red), 7-segment subdisplay (yellow), laser ON (green), zero reset (green), enable (green) | ||
| 140 mA max. with power supply voltage of 24 VDC (with sensor connected) | ||
| Operating: 0 to 50°C, storage: -15 to 60°C (with no icing or condensation) | ||
| 10 to 150 Hz, 0.7-mm double amplitude 80 min each in X, Y, and Z directions | ||
| 300 m/s2 3 times each in six directions (up/down, left/right, forward/backward) | ||
| Case: PBT (polybutylene terephthalate), cover: Polycarbonate | ||
Calculating unit
ZX-series Communications Interface Unit
| CompoWay/F17 | ||
| Data bits: 8, parity: none, start bits: 1, stop bits: 1, flow control: none | ||
| Power supply: green, sensor communications: green, sensor communications error: red, external terminal communications: green, external | ||
| Operating: 0 to 50°C, storage: -15 to 60°C (with no icing or condensation) | ||
| Case: PBT (polybutylene terephthalate), cover: Polycarbonate | ||
3. When using the ZX-TDA11/41 with the SmartMonitor, either the ZX-SFW11EV3 or the
ZX-SW11EV3 SmartMonitor must be used. Earlier versions cannot be used.
5. Beam diameter: This is the value of the measurement center distance (actual value), and is defined at 1/e2 (13.5%) of the central light intensity. If there is stray light outside, the defined area and the area around the object has a higher reflectance than the object.
6. Resolution: Indicates the amount of fluctuation (±3 δ) in the linear output when connected to the ZX-LDA. (The measured value when the average count of the ZX-LDA is set to 4,096 and our standard object (white ceramic) is used for the central distance.) This indicates the repeatability precision when the work is in a static state, and does indicate the distance precision. The resolution performance may not be satisfactory in a strong electromagnetic field.
7. Linearity: This indicates the error with respect to the ideal straight line of the displacement output when measuring our standard object.
8. Temperature characteristic: The temperature characteristic is measured at the measurement point with the sensor and reference object (Omron’s standard reference object) secured with an aluminum jig.
9. The amount of fluctuation (±3 δ) of the linear output when connected to an amplifier unit, converted to a detection span.
10. When the average count is 64. 5 µm when the count is 32. The value when the smallest detection object shades the vicinity of the center of the 1 mm dia. detection span.
13. The response speed of the linear output is calculated as the measurement period x (average count setting + 1) (with fixed sensitivity).
The response speed of the judgement outputs is calculated as the measurement period x (average count setting + 1) (with fixed sensitivity).

